Friday 20 December 2013

Once upon a time

A very poor woodcutter lived in a tiny cottage in the forest with his two children, Hansel and Gretel.

Know the story? 

Everyone loves a gingerbread house don't they?! I've been planning to make a gingerbread house this Christmas for a few months and have a board on Pinterest with a few ideas. I know that Mary Berry made one on the GBBO special last week but I've not got round to watching it yet.

I believe her recipe, amongst others, uses dark muscovado sugar but I've just run out. So I used a different recipe. Eeeeek. Stress. Would the gingerbread go hard enough? Dark enough? Rise too much?

Mine did rise but not too much and it didn't affect the building of the house (phew). I'd already made some royal icing at the weekend for my Christmas cake and I make mine with powdered egg white.
1 x 8g sachet of powdered egg white, 250g icing sugar, 45ml water is my recipe for royal icing.

On to the gingerbread. I did use Mary Berry's template in a fashion (http://downloads.bbc.co.uk/tv/christmasbakeoff/gingerbread_house.pdf), I reduced the size by about 1cm top and sides and omitted the star (because I forgot). I then also forgot to cut windows but did remember the door at least. 

Ingredients: enough to make one house plus two extra gingerbread men

350g plain flour
1 tsp bicarbonate of soda 
2 tsp ground ginger
1 tsp cinnamon 
125g butter (vitalite)
175g light soft brown sugar
1 egg
4 tbsp golden syrup

Add the flour, bicarbonate and spices to a food processor and blitz to mix. Add the butter and whizz until it's like breadcrumbs then add the sugar. Mix the egg and syrup together and pulse until the mixture clumps together. Tip out and knead briefly until it forms a dough then chill for 15 minutes.

Heat the oven to 180/160 fan and line baking sheets with baking paper. Take out the dough and roll until it's about 5mm thick. Be careful when transferring to the sheets that they keep their shape. Bake until turning golden brown then leave to cool completely.

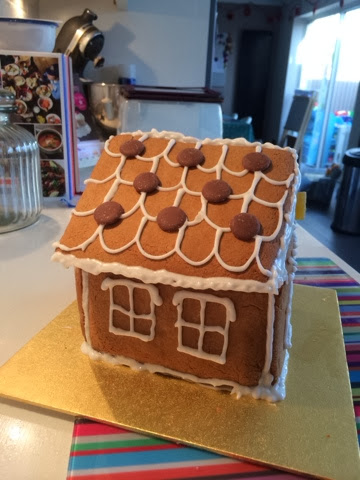
To assemble, I first stuck one front and one side together with icing also on the base to stick to the board (I used a square cake board). Use the icing like mortar. The icing shouldn't be overly runny either. 

Add the back then another side so you have the complete base. I should have taken photos at this stage but didn't. I then left it a couple of minutes to harden a bit. When I was confident to continue I added the roof panels. Here gravity really comes into play and I used cups of the correct height to hold the roof in place. Then added the second roof panel. There's a chimney too but mine was at the wrong angle to use - abandoned to the children's awaiting mouths. 

At this point I realised I had no actual plan of how to decorate and realised I'd forgot to cut windows in. So I piped windows on with extra icing on the tops and sills to look like snow. I filled in all the edges of the house and roof, piped around the door frame then decided in a millisecond to pipe on roof tiles. At this point I thought it best to raid the cupboards to see if I had any sweets. I found a small packet of chocolate buttons and some fruit pastilles so stuck those on. I then went round to add more "snow" then stood back to admire my work. So it's plain, not very inventive at all after all my Pinterest planning, but it was done and it was standing. Success!

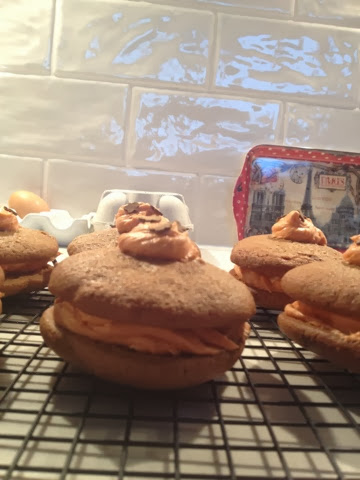
The boys had the gingerbread men for tea and they're rather scrummy

Next year I'll try and be more inventive!


Monday 16 December 2013

Oh the weather outside is

Mild actually!

But Christmas is almost upon us and so it's time I bake a Christmas cake.

I don't go in for the baking of the cake in October and feeding it until it's gluttonously rich with alcohol and popping currants. Instead I bake it whenever I feel like eating Christmas cake ever since coming across this recipe from the (I'm ignoring the allegations) fabulous Nigella. Whatever may be being said about this woman, you can't take away that the fact that she can cook and a lot of my baking repertoire is Nigella simply because her recipes work! #nigellafanclub

On to the recipe. It's for a chocolate fruit cake. Ignore the word chocolate really as it literally contains 2 tablespoons of cocoa powder, which in a recipe which contains 725g of dried fruit, is negligible. But it's there. So there!

Of course I have a slight twist on it as usual, so here's my version.

Ingredients:
350g prunes (chopped with scissors)
175g mixed dried fruit (tesco do a bag)
200g morello cherries (stoned and chopped)
175g butter (or margarine)
175g dark muscovado sugar 
175ml honey
1tbsp coffee powder*
125ml water*
Juice and zest of 2 oranges 
1 tsp mixed spice
2 tbsp cocoa powder 
3 eggs (beaten)
150g plain flour
75g almonds
1/2 tsp baking powder
1/2 tsp bicarbonate of soda

*The original recipe calls for 125ml Tia Maria. I had none, nor any brandy or rum so just added water and coffee granules.

Add the fruits, butter, sugar, orange juice and zest, spice and cocoa powder to a large pan and bring to the boil. Stir and simmer for ten minutes then leave to cool for half an hour. 


Prepare the tin and set the oven to 150c.
For the tin, I can't remember what I used in the past, but the recipe says to line a 20cm/8" tin that's 9cm deep. After lining my tin I realised mine wasn't 9cm deep so I added the remaining batter to two medium sized silicone cupcake cases (http://www.lakeland.co.uk/16300/Giant-Silicone-Cupcake-Case)

Line the sides and bottom of a round loose bottomed tin with greaseproof paper making sure the paper comes above the top of the tin.

Add the eggs and other dry ingredients to the pan and mix until well combined. Pour the mixture into the prepared tin and bake for 1 3/4 - 2 hours until the top of the cake is firm and looks shiny and sticky. Leave to cool in the tin on a rack.

I left mine overnight before covering. As it's not a traditional Christmas cake recipe, you don't have to cover it in icing. You can eat it as it is or like Nigella does, add some edible gold stars and glitter.

But I LOVE icing and marzipan so I cover mine. I couldn't settle on a decoration this year so as I love gingerbread men I decided to do an iced flooded gingerbread man. I initially made little ones to go round the side of my cake, bit when I botched up the cake tin sizing, I used two of them to go on the smaller cakes. I also decided not to cover the whole cake and just give them a marzipan and icing top

Merry Christmas everyone xx


Tuesday 3 December 2013

Der Hatton Weihnachtsmarkt

It's with much sadness that we're not going to Germany this year to the Christmas markets. So today I decided it should be 'der Hatton Weihnachtsmarkt' (the Hatton Christmas market)

For tea we had bratwurst (sausages) with bread cakes, mustard and sauerkraut. Yesterday I'd made a start on my Lebkuchen so we've just had a few now with a mug of steaming glühwein.

I came across this recipe for Lebkuchen on my Facebook feed. I'm a huge Lebkuchen fan. They just taste of Christmas. So it was only fair I finally made my own. 

Making these in Germany, you'd buy a packet of Lebkuchengewürz but you can't lay your hands on it easy over here. But this recipe just uses easy ingredients (all of mine except one I didn't have, were in fact store cupboard).

It is perhaps one of the oddest recipes I've ever made but the results are brilliant and I will use this recipe again and again and again.

The recipe gives a nice spiced chewy not soft, not hard biscuit that's not too heavy on the spice. Just right!

Makes around 24 depending what cutter you use. I used a star cutter I have that's about an inch and a half wide.

Ingredients:

85ml honey

115g dark brown sugar

30g butter/stork/Vitalite

225g plain flour, sifted

1 tsp cinnamon

1/2 tsp ground ginger

*1/4 tsp ground nutmeg

1/4 tsp bicarbonate of soda

1 egg, beaten

50g ground almonds

* I had no nutmeg so I left that bit out bit added 1/2 tsp allspice (which contains nutmeg). I also only had 27g almonds but it made no difference.

In a large pan place the honey, sugar and butter. Heat over a gentle heat until the butter and sugar have melted then remove from the heat.

Beat the egg then add half with half of the flour, spices and bicarb. Add the rest of the egg and dry ingredients followed by the ground almonds.

At this stage it's very very very sticky. 


Spoon it into a bag and pop in the fridge overnight. You'll be wondering how this floppy runny mess will make biscuits but trust me it will. You can leave the dough for three days.


It hardens up in the fridge to one big sticky mass. No laughing at this photo ;)


Take out of the fridge and roll out to about 7-10cm thickness. It's an absolute bu***r to roll out. You need to place it between two sheets of greaseproof and roll out, but it's very hard, very stiff and difficult to do but please persevere.

Then cut out with the cutter of your choice. Again they're not the easiest thing to cut out as they stick easy so the shape can get distorted (why in my eyes a star cutter is best as you can do a little tweaking to the shape). I used bake o glide so can't comment on the use of paper or just the tin but whatever you use (unless it's bake o glide) then grease well!


Bake in a preheated oven at 170c fan for 8-9 minutes until golden. Leave to cool for five minutes then transfer to a wire rack.

Make a loose icing mixture of icing sugar and water (quite runny) then use a brush to dab over the cooled Lebkuchen.

Apparently they will keep for three weeks in an airtight container

Yeah right!


Saturday 23 November 2013

Swirling and twirling

I like to make an edible gift for the boys' party bags so when I stumbled across green swirl biscuits on Pinterest last week, I decided I just had to make them for Hayden's birthday party. Worth a shot at least.

The original link on Pinterest was for an American recipe. Gah!!!! But a quick google search led me to a UK recipe. And relax!

Here we go:

220g butter 

220g caster sugar

1 large egg

370g plain flour

Food dye gel

Hundreds and thousands


Cream together the butter and sugar until light and fluffy then mix in the egg. Add the flour and mix until you have a smooth, well combined dough. It shouldn't be sticky at this stage.

Split the dough in half, colour one of the pieces with the food dye gel colour of your choice. I used my Kitchen Aid to do this so put this half of the dough back in the mixer, add the dye and beat until the colour is well mixed into the dough.

Place one piece of dough between two sheets of baking parchment. Roll out until dough is around 4mm thick and slightly smaller than an A3 piece of paper. Repeat with the other ball of dough, then chill the dough sheets for 30 minutes.


Take the dough out of the fridge, remove one side of the baking parchment then flip one piece of dough on top of another. 


Place the baking parchment on top and roll the dough a bit more to help the two layers to merge. Then starting with the long side tightly roll the dough into a long sausage. Wrap well in clingfilm. Roll the dough back and forth to get a tight cylinder and get rid of any bubbles in the dough. You’re aiming to roll a cylinder that has a diameter of around 4cm.

Unroll the clingfilm and place this and the dough in a shallow baking tray. Sprinkle a generous amount of sprinkles over the dough and roll it over to embed the sprinkles in the dough. It's best to use a baking tray as hundreds & thousands will roll everywhere otherwise. Randomly my Sainsburys didn't have hundreds and thousands only red, yellow and Christmas colour mix. I decided to go for red.


Wrap the dough back up and place it back in the fridge for another 30 minutes

Preheat the oven to 160°c (fan)/180°c then take the dough out of the fridge and cut into rounds about 4mm thick. Place on a lined baking tray.


Bake for 12-15 minutes until they are only just beginning to turn golden brown. Just be careful, due to the sugar content of the biscuit they can go from uncooked to burnt in a very short time

Once the biscuits have baked transfer to wire rack and leave to cool completely. They are still really quite soft at this stage but they harden on cooling. Some of the hundreds and thousands lost their colour a bit and the biscuits aren't as vibrant as the original American recipe (I say they've been photoshopped) but they do look quite nice in my opinion (better in real life than on the photos)


    Thursday 21 November 2013

    Muffins but the savoury kind

    I've been meaning to have a go at English Muffins since I saw them as the technical challenge on GBBO and finally got around to making them. I decided to therefore use the GBBO recipe which is as follows:

    300g strong white bread flour
    6g fast-action yeast
    6g salt
    15g caster sugar 
    15g softened butter, cut into small pieces
    1 medium free-range egg
    170ml milk 
    Semolina plus extra for dusting

    Tip the flour into a large mixing bowl. The recipe states you should knead by hand but I decided to go with the dough hook as I knew it was a wet dough. 

    Sprinkle the yeast on one side of the flour and the salt into the other side of the flour. Add the sugar, butter, egg and milk, then mix all the ingredients together to form a soft dough then let the hook knead for 10 minutes, or until soft, smooth and stretchy. The dough was fair too wet for my liking so I did what you're not supposed to do and added a bit more flour.

    Lightly grease a large bowl with oil. Place the dough in the oiled bowl, cover and leave to prove for about one hour, or until doubled in size. By this point mine had hardly risen. No idea what I'd done so maybe actually do do them by hand!

    Dust the work surface with a mixture of the semolina and flour. Tip the dough out onto the work surface and roll out to about 2.5cm thick.

    Lightly dust two baking trays with half of the semolina

    Using a 9cm straight-sided cutter, cut out eight muffins. I didn't measure my cutter, just used what I thought looked right. 

    Place four muffins, evenly spaced apart on each of the dusted baking trays. Dust the remaining semolina or polenta over the top of the muffins and leave to prove for another 30 minutes. They did change a little bit by this point.


    Now......the recipe then goes like this:
    Preheat a hot plate or a heavy-based frying pan on the hob to a very low heat. Griddle the muffins for approximately 5-6 minutes, then flip over and griddle for another 5-6 minutes on the other side.


    I have a hot plate but could only fit two on so did two in a frying pan too. I only had 4 muffins out of my dough because it just didn't rise. You're supposed to get 8. After 6 minutes each side they still felt doughy in the middle so I popped them into the oven to bake a bit. 


    Ideally you're supposed to leave them to cool then slice and toast but we ate ours straight away with butter, bacon and poached eggs. They were nice and turned out ok. I would hope to get the requisite number out of the dough next time, maybe make them a tad smaller and roll the dough a bit thinner as I think they were too thick. So not a total fail. Just a small one maybe.

    I certainly wouldn't have done well in that technical bake off!


    Mine's on the left. Shop bought on the right 


    Wednesday 6 November 2013

    Whoopie!!

    Having only ever eaten one whoopie pie in my life and being really behind the times, when thinking what to bake for Bonfire, for some random reason I decided to try a whoopie pie for the first time. They're so last year (or two or three) darling but hey ho!

    But what is a whoopie pie some may be asking? Well it's half cake, half cookie, so not hard but not soft like a bun. The name whoopie pie comes from years back when Amish farmers would find the treats in their lunch and would shout "Whoopie".

    November to me is Parkin month. I wanted to try and find a recipe that combined Parkin with the whoopie pie but they don't exist online and I left it too late to come up with my own recipe. One flavour of Parkin though is ginger so I thought Gingerbread whoopie pies might be nice. I settled on an American recipe as a lot of recipes contain buttermilk and I'd already been shopping so ideally wanted a store cupboard recipe. And this one was. I noticed though it was in the dreaded cups which I thought might be ok but the flour was measured in ounces. Eek. Stress! But the website had an easy conversion button on it and voila. One press and all my dreams came true.

    Here we go:
    280g plain flour
    100g caster sugar
    120g dark muscovado sugar
    2 1/2 tsp ginger
    1 1/4 tsp baking powder (recipe said baking soda-no idea if that's baking powder or bicarbonate of soda so I plumped for baking powder)
    1 tsp cinnamon
    3/4 tsp salt 
    80ml vegetable oil
    1 egg
    80ml boiling water 

    Preheat the oven to 180c fan

    Line baking sheets with grease proof paper.

    Combine the flour, white sugar, muscovado, ginger, baking powder, cinnamon, and salt together in a large bowl. Mix in the vegetable oil and egg until combined. Pour in the boiling water and whisk until smooth. It makes a very thick sticky batter.


    Drop in spoonfuls (huh?) onto the baking sheets. I had no idea how big they were supposed to be so just guessed.


    See how thick and gloopy they look? I was getting a bit nervous by this point.

    Bake in the oven for 12-14 minutes and allow to cool on the sheets for 5 minutes before removing to a cooling rack.

    For the filling I decided to just make a spiced buttercream. I have no idea of quantities as I generally make my buttercream from taste, mixing icing sugar with butter. I added a tsp of ginger and a tsp of cinnamon then some orange food colouring as I wanted it to be orange for some random reason.

    So here we are. My mahoosive gingerbread whoopie pies.


    But I wasn't done. I had a bit of filling leftover and just got some gorgeous mini teeny weeny sparkly gingerbread men from Sainsbos so decided to put a swirl of filling on top and top with three gingerbread men. How very festive of me!

    No idea if everyone else liked them but I liked mine and looking forward to making a chocolate version. I'm thinking chocolate and cherry or chocolate and orange. Any takers!


    Wednesday 30 October 2013

    Devilishly good?

    It's Halloween tomorrow and a few days ago I saw a fab photo of some yummy looking cupcakes. These were last year's (orange sponge, black frosting) so decided to do something similar this year. 


    The recipe which went with the photo I saw of the cupcakes I wanted to make, was a devil's food cake recipe. But it used cups. I don't like using cups so settled on god old faithful Ms Lawson's Devil's food cake recipe. The recipe is for a cake (8"/20cm) but I figured it'd fit into 12 muffin cases. And it did! I use muffin cases rather than cupcake cases

    Devil's food cupcake batter:
  1. 50g cocoa powder
  2. 100g dark brown muscovado sugar
  3. 250 ml boiling water
  4. 125g soft unsalted butter
  5. 150g caster sugar
  6. 225g plain flour
  7. ½ teaspoon baking powder
  8. ½ teaspoon bicarbonate of soda
  9. 2 large eggs

  10. Preheat the oven to 170c fan.

    Put the cocoa and dark muscovado sugar into a bowl and pour in the boiling water. Whisk to mix, then set aside. 
    Cream the butter and caster sugar together, beating well until pale and fluffy.

    Measure the flour, baking powder and bicarb together in another bowl, and set aside for a moment. Add 1 egg to the creamed butter and sugar, followed by a scoopful of flour mixture, then the second egg. Keep mixing and incorporate the rest of the dried ingredients for the cake, then finally mix and fold in the cocoa mixture, scraping it's bowl well with a spatula.

    It's a runny batter so I used a ladle to fill the muffin cases until 3/4 full. 


    Bake for 18 minutes until they're nicely risen and a cake tester comes out clean. Leave to cool.


    (Excuse the yellow patches in mine, I didn't mix the batter well enough)

    I've been struggling with buttercream frosting being too sweet recently (for my very opinionated family cake testers) so decided I'd have a go at a cream cheese frosting for these bad boys and hope that it would take colouring without turning funny. I have a red sugarflair gel but I wanted to use extra red as most times I use the normal red it'll turn what I'm colouring pink.

    Frosting:
    4 tbsp butter (softened)
    200g cream cheese
    400g icing sugar

    Mix the icing sugar and butter for 2-3 minutes until combined and creamy. Add the icing sugar in 2 or 3 goes (attempting to avoid an icing cloud of doom which covers the kitchen in fairy dust). Pop into the fridge until you're ready to use.

    It's preferable to make the devil's horns the day before to give them time to go hard. Colour fondant black (I used extra black) and break off little balls, roll in your hand to a taper on one end and turn upwards to make a horn shape.

    Frost the cupcakes when cold and add your horns!


    I think someone enjoyed them!


    Saturday 26 October 2013

    Peaches and cream

    I decided to try a recipe that wouldn't be one I'd go for seeing as I won't be eating what I was going to bake so decided I'd try Hummingbird Bakery's coconut and pineapple cupcakes.

    After a small family discussion (read argument), it was decided for me that I wouldn't be doing coconut and pineapple cupcakes rather that I should do the peaches and cream. Everything was store cupboard anyway for both so off I went to start.


    120g plain flour

    140g caster sugar

    1 1/2 teaspoons baking powder

    40g unsalted butter

    120ml full fat milk

    1 egg

    1/4 teaspoon vanilla extract

    400g tinned sliced peaches 

    Beat the flour, sugar, baking power and butter until the mixture has a sandy consistency. Gradually pour in half the milk and beat until it is just incorporated.

    Whisk the egg, vanilla and remaining milk together then pour it into the flour mixture. Beat until the mixture is smooth. Don't overbeat. It's a very loose mixture, one that I'm not normally used to when making cakes.

    Add the sliced peaches to the cupcake cases. I found that one tin had enough peach segments to put two per case and fill 11 cases like this:


    Fill the cases until two thirds full

    Bake at 170c fan for 20 or 25 minutes, until the tops are golden. Leave in the tin to cool. When you take them out they'll have a very squishy bottom oo er

    Frosting: 

    250g icing sugar

    80g unsalted butter

    25ml milk

    a few drops of vanilla extract

    Beat the icing sugar and butter together until the mixture comes together. Add the vanilla extract and milk. Turn your mixer up to high speed and beat for about 5 minutes or until the frosting is light and fluffy. I found though it was too loose so added more icing sugar. 

    Ice the cupcakes and top with some Demerara sugar.

    Warning: These need to be eaten with a spoon!

    Comments were that the cake was lovely but the icing too sweet. Next time I'll substitute the topping for whipped cream or just pour over some cream as you need to eat with a spoon anyway.