Sunday, 23 February 2014

虎穴に入らずんば虎子を得ず。

Which in my best Japanese means if you do not enter the tiger's cave you will not catch its cub.

I.e nothing ventured, nothing gained

I like sushi. I love it. Hubby didn't. Until recently when I made him try one of those supermarket prepacked ones. Yes I know they're not as good as the real fresh thing but they're a decent enough attempt in my opinion.

I decided that I should therefore try my own as my diet had yet again fallen by the wayside for the week (back on it again tomorrow lol). I purchased a sushi mat on Friday (the Ching He Huang one which comes with bamboo spoon which is great for spreading the rice out).

Our large Tesco has an international aisle so I could get sushi rice and nori but sadly they had neither wasabi nor pickled ginger which I found disappointing for such a well appointed international aisle. Luckily Waitrose had both. Tick!

Sushi rice:
So many different ways to cook. Double the amount of water to rice? Enough water to cove the rice? 10% more water than rice? To rinse the rice beforehand or not?
I decided not to rinse and put in the pan with enough water to cover but even with the lid on it absorbed it all before it was cooked so I just added a bit more. It took 15 minutes. The rice was 95% cooked when I took it off the heat and added 1 tsp of caster sugar and 2 tbsp of rice wine vinegar. I left the rice to cool in the pan until I wanted to roll my sushi.

So to assemble, get your sushi mat and a sheet of nori. Oh my goodness, it stinks of fish food. I wasn't quite prepared for that!

There's a shiny side which needs to face the mat then spread enough sticky rice onto the seaweed, not too thick and leave an edge free at the top (I did at the bottom too). Add your fillings into the middle then roll the mat up tightly cupping round the roll as you go then leave for a minute rolled up before unrolling the mat and slicing 


You can use any fillings you want really. 

I also decided we'd have gyoza as well. We love gyoza. I especially love Wagamama's duck and chicken gyozas. The duck have a hard shell and the chicken are steamed so I thought I'd try a go at two ways of cooking them.

Unfortunately I didn't realise I'd run out of strong white bread flour so had to use just plain.
200g strong white bread flour
100ml boiling water
Salt 

Mix together until a dough is formed, you might need to use more or less water. Knead for 5 minutes then cover for 30-60 minutes. Roll out and use a large circular cutter then add a teaspoon of filling and close. This quantity will give approximately 18 gyoza wrappers.

For the filling I used the following:
One pack of king prawns chopped
1 tbsp oyster sauce
Salt and pepper
One small chunk of ginger, grated
2-3 spring onions, chopped 

Mix all of these together in a bowl before filling the gyoza wrappers.

Wrapping them up was not my forte but I got the approximate shape eventually. You need to fold the wrapper over in half then pinch close a bit like making a pasty. YouTube some tutorials!


I cooked them in two batches. The first half I fried one side in a bit of oil then added 100ml of water and covered with a lid to create steam and steamed for ten minutes.


The second batch I fried on both sides and only steamed for a couple of minutes with only a dash of water. I preferred the longer steamed one, hubby preferred the fried ones.

But I'll definitely be making gyoza again and will make sure I have the proper flour in.


We served our dishes with soy sauce, pickled ginger and wasabi. Oh my, that wasabi was a hot hot hot one!! 


Douzo meshiagare


Saturday, 15 February 2014

Moley moley moley moley moley

....as quoted by Austin Powers in Goldmember. We couldn't help ourselves but quote this repeatedly this afternoon while prepping tea.

So as you know I bake. I love to bake. But I also love to cook and recently coming up with new meals has just gone by the wayside with my seemingly endless dieting which hasn't really got me very far.

I digress. I actually fancy myself as a good cook. There I said it. Got to be proud of something in myself.

I digress further. 

I've wanted to make a mole for years but just never randomly got round to it. But it was finally time to bring the Mexican national dish to our kitchen (despite hubby not knowing really what it was or that it was a national dish of a country he's been to twice).

There are hundreds of variations on how to make a mole and the old traditional ways of preparing a mole would be very time consuming and laborious (thanks wiki!). But thanks to my blender it took very little preparation time in my modern day kitchen. With so many recipes to choose from I plumped for Good Food's version (with some alterations)

Good Food / Chele's Chicken Mole
2 chillies
Sunflower oil 
2 chicken breasts 
1 1/2 onions 
1 tsp cumin
1 1/2 tsp cinnamon
3 garlic cloves
40g raisins
2 tbsp peanut butter
2 tbsp chipotle / jerk paste
400g tinned tomatoes
25g chocolate min 70% cocoa solids

Boil the kettle, pour enough water over the chillis to cover them and leave them for 20 minutes.

Heat some oil in a heavy based pan / casserole dish and brown the chicken breasts on both sides for a few minutes then remove. Fry the onions gently for 5 minutes until soft then add the cumin and cinnamon and cook for another minute.

Destalk and deseed the chillis and place in a blender with the garlic cloves, chipotle paste, raisins, 4 tbsp of the water you soaked the chillies in and tomatoes. Blend until smooth. Add the peanut butter to the pan of onions then pour over the chilli sauce you've just blended. Swirl out the tin of tomatoes, so you get all the leftovers, with cold water and add to the pan. Bring to the boil, add the chicken back in and turn to a low heat to simmer gently for an hour with the lid on. It should be a medium brown colour and fairly thick.

After an hour add the chocolate and break up the chicken breasts in the pan. Cook for a further 20 minutes with the lid off.  It will now be a dark brown colour and thick.

We served ours with taco shells and microwave lemon and coriander rice.

It was quite spicy leaving a very warm mouth so if you don't like things too spicy I would leave a chilli out and reduce the amount of chipotle paste.

* I couldn't find any chipotle paste so used jerk paste instead 

Buen provecho!


Monday, 3 February 2014

Nice day for a white wedding

Actually it was freezing. But the snow and rain held off.

My little brother got engaged last year, and bless, they asked me to make their wedding cake. Oh how I do love to bake and yes, I do dabble with decorating, but never profess to be any good, quite the opposite actually, but I was never going to say no to them!

Somehow I then seemed to be making the favours too. These bad boys took ages but I think they looked beautiful, especially all bagged and tagged up at each place setting 


Onto the cake. The design was discussed, a whole afternoon was spent calculating cake tin sizes (as due to the design a degree in maths was required) and flavours were chosen: Victoria sponge, devil's food cake, lemon and salted caramel 

A maths degree would have been so handy as I then had to calculate how much batter for each sized tin would be required. Brain freeze!!!!! Gah!


I made the Victoria sponge using my famiy recipe but I added a bit more flour. Lemon is made just the same as Victoria but with lemon zest and juice added. The devil's food is the same as I've blogged about a few times. But salted caramel was the challenge. I've never made a salted caramel cake and it was actually quite difficult to find a recipe as most are chocolate based. But I came across one on an American site for salted caramel cupcakes and having never used an American recipe, I decided to give it a go for a really important cake. Sensible huh?!

But it worked. Kind of! I made the cake, did wonder why the batter was so thick and the cake so dense but figured it was just meant to be like that. Until I opened the fridge two hours later and found a pint of full fat milk. We don't usually have full fat. Then it hit me. I'd missed it out!

So I remade the cake and we ate the old one. Have to admit I thought it tasted amazing. I will definitely be making this cake again. Here's the recipe:
190g plain flour
3/4 teaspoon baking powder
1/2 teaspoon salt
200g dark brown sugar
100g caster sugar
115g unsalted butter 
2 large eggs
120ml whole milk

Beat the butter and sugars together for about 2-3 minutes until light and fluffy. Add the eggs and beat until combined. Mix in the dry ingredients then slowly mix in the milk. Pour into either 12 cupcake cases or a 2 x 7" cake tins

I used a filling I made at Christmas for my chocolate salted caramel ombré cake 


I needed to cover the cake board, something I've never done before. When I did my cake decorating course we were only taught to cover with royal icing. But YouTube has loads of tutorials for covering fondant and I found it really easy. I'll be covering loads of boards from now on, I've always left them with the bright silver cake board showing. 


All cakes baked it was time to assemble. I'd already made the roses. All 100 of them. With 5 petals each that 500 petals I rolled out. But I do love fondant roses.


I colour fondant to the colour I need, roll it out to about 2mm thick and using a very small round cutter, cut out 5 petals for one rose. Roll one of the rounds into a cylinder, add a petal and wrap round, add another petal and wrap round etc. I'll have to do a tutorial one day. There's loads if you google but I can't find one which shows the way I do it.

I stacked the cakes to see how they may look 


Then the most nerve wracking bit for me. Covering with fondant is my nemesis. I'm getting better though. I think.
Crumb coating first though!


The base of the square cakes were covered with ribbon and the round cakes had the roses "glued" to them with royal icing. Then I piped royal icing dots on the square cakes


I decided to assemble the bottom two tiers, the top two, transport to the venue then assemble the two together.

That was the most stressful car journey of my life. 11 miles, 33 minutes, speed bumps, roundabouts. I held my breath over each bump. But it made it there. Phew!

All assembled the day before the wedding 


And the finished cake with flowers and birdcage


It was very stressful but I really enjoyed doing it. Congratulations Mark & Heather


Sunday, 19 January 2014

Hen do goodness

It was my future sister in laws hen do yesterday and being preggers, she organised afternoon tea at her house with an evening of pamper treatments for herself and the hens.

But what's afternoon tea without cakes and scones?

And do you pronounce scone as rhyming with gone or phone? :D

I've made hundreds of scones over the years. They're often a Sunday afternoon requirement when I'm round at my parents and dad demands scones. But as they're really simple to make, with only a few store cupboard ingredients and I can whip up in 15 minutes, then I usually oblige. It's at that point they realise they only have butter and jam. Mmmmmm clotted cream.

I use Delia Smith's recipe as I've always used it. It doesn't make for a really high scone but we love them and I'm loathe to change to be honest.

Plain scones
40g soft butter/margarine
225g self raising flour
1 1/12 tablespoons of caster sugar (I actually use 3 sometimes)
110ml milk
Makes 5-6 depending on size of the cutter.

Preheat the oven to 220c/200 fan

Rub the butter and flour together until it looks like crumble and stir in the sugar. Using a knife, mix in the milk adding a little more if required and bring the dough together quickly. Try not to mess with the dough too much. Roll out to a thickness of about 3cm and using a cutter (I prefer fluted) cut out circles and place on a baking tray. Bring the rest of the dough together to cut extras out and when there's only a bit left, I roll it into a round shape and cook that too. Pop into the oven for 12-15 minutes until going golden brown.  A bit like bread, they sound hollow when tapped to let you know they're done. Ideally they need to be eaten the same day.

I do have to admit that the batch I made yesterday weren't my best looking and I forgot to take a photo (honestly not on purpose). I think it was because I used a plain round cutter and this is the first time in probably ten years that I've used a conventional oven and not an aga. As I don't own an aga (my parents do, which is where I normally bake them), then my lovely oven at home had to do.

____

Other cakey goodness was also required and despite discussing with the hen, what I was going to make, I changed my mind lol. I did however still do the devil's food cupcakes as discussed. I've already blogged about these when I made them for halloween last year but this time instead of cream cheese frosting, I made the original fudge topping that comes with the Nigella recipe. I didn't actually follow the exact recipe (OH here I go again!) because I didn't have enough chocolate and this recipe is actually to fill and cover a cake. But what I did end up with was the perfect amount to top 12 cupcakes so here's the original recipe. I just reduced the quantities slightly, but it wouldn't be an issue to make this amount and just put more onto the cupcakes then I did. Then they'd just be extra devilishly good:

Devils food fudgy topping
125ml water
30gram dark brown muscovado sugar
175g butter
300g dark chocolate

Put the water, sugar and butter in a pan and bring to the boil. As soon as it boils take off the heat and add the chocolate broken into pieces. Stir when it's melted. Then every 10 or 15 minutes or so as you go past, just give it a stir. As it cools, the mixture thickens and when the cakes are finished and cooled you will have the perfect gooey chocolately topping for them which you can just spoon on and swirl round the cupcakes.


____

Veering off from the original plan, I decided to do what my mother calls my signature bake. Lemon drizzle loaf cake. I love this recipe. It makes a sticky lemony slice of cake which lasts a week (if you stay away from it). And of course, it's a Nigella recipe (I love Nigella, always have, always will). Because I make quite a lot of these, I invested in some 2lb loaf tin liners from Lakeland.

Lemon syrup loaf cake:
125g butter/margarine
175g caster sugar
2 large eggs
zest of 1 lemon
175g self raising flour
4 tbsp milk
Juice from the lemon
100g icing sugar

Line a 2lb loaf tin with greaseproof if you don't have a liner and preheat the oven to 180c

Cream the butter and sugar together then add the eggs one at a time, beating after adding each one. Add the lemon zest then mix in the flour. Finally add the milk and mix to a smooth batter before pouring (I spoon) into the loaf tin. Bake for 45 minutes until golden brown and a skewer comes out clean.
As soon as the cake is ready, add the lemon juice and icing sugar together in a pan and heat. Stir until the icing sugar has dissolved, then prick the cake all over and pour over the icing glaze. It will sink into the holes and the cake sponge will draw the icing glaze into it making it all moist inside. I then leave the cake overnight but if you want to eat it the same day, then I suggest making it early morning then taking out later that afternoon. It doesn't look like an enticing cake, but trust me, it tastes lovely.


____

I had some puff pastry that needed using by the end of the month so I also suggested using it to make some kind of pinwheel. There was a vegetarian there so my sister in law suggested a vegetarian pinwheel. I came across a page on google which had about 30 different pinwheel recipes and is where I got the idea for these:

Mushroom, Gruyère and thyme pinwheels:
1 sheet puff pastry (block or ready rolled)
2 packs chestnut mushrooms
Block Gruyère cheese coarsely grated
1 tbsp dried thyme
Salt and pepper
3 tbsp crème fraiche
Makes approx 25 pinwheels

Preheat the oven to 200c/180 fan. Line baking sheets with baking/greasproof paper.
Slice the mushrooms and add to a large frying pan with a little oil and cook until they've lost their water and are cooked. Season with salt and pepper and add the dried thyme and crème fraiche. Roll out the puff pastry into a large rectangle about 40 x 25cm (or just open the packet if it's pre-rolled) and cover the pastry with the mushroom mix, leaving a one inch edge spare on one of the long sides. Sprinkle over the cheese then with the longest side nearest to you and the spare edge at the top furthest away from you, begin to roll into a swiss roll. Now you'll see why you needed to keep an edge free from food! Gently slice the roll to make the pinwheels, about 1cm thickness and lay them flat on a pre-lined baking sheet. You definitely need to pre-line the sheets or the pinwheels will stick. Leave space between each one as they spread a little as they bake. Bake in the oven for approximately 12 minutes until turning golden brown. Leave to cool on a wire rack. I always have to cook these in batches as I only have two baking sheets.


Wednesday, 8 January 2014

New Year catch up

It's the 8th of January and I've not baked one thing yet. My fingers are twitching so I can feel it coming on soon as I sit here looking at sourdoughs in my Paul Hollywood book.

But it's 8pm and not time to bake so I'll catch up on my Christmas baking.

I decided eventually not to make my own mince pies as our local bakery makes the most amazing mince pies with cream cheese and orange pastry. I've made my own version (I'll hunt out my recipe later) but decided to cheat this year. I did make a cake though, a gingerbread house and some Lebkuchen (see previous blog posts) 

I did decide however to make some cake pops as a practice for my brother's wedding (but a Christmas theme) which turned out ok. They're very very sweet but since you only get one/two mouthfuls then that's fine by me. They're one of the trickiest things to make. You have to have more candy melts than you require so you can get a good dip. You have to roll the cake pops to the right size (with trial and error mine were 20g each). They need to chill before you coat so the stick won't slide out but you can't let them get too cold or the coating will crack as the cake pops warm up.........etc etc. but I was pleased for my very first attempt. 


Christmas Dinner in our family is always followed by puddings. Most of my family don't like fruit puddings like Christmas pudding so I always choose a new dessert to try each year. This year I decided to make vanilla pannacotta, ginger ice cream and a cake my mum found in a magazine in September which she demanded (politely) I make. It's a salted caramel chocolate ombré cake made of five layers of different coloured sponge filled with salted caramel and chocolate ganache. 

Salted caramel chocolate ombré cake:
425g plain flour
25g baking powder
200g butter
300g icing sugar
6 large free range egg whites 
275ml milk
4 tbsp cocoa powder
5 1/2 tsp instant coffee granules
1/2 tsp gel black food colouring 

Ganache:
400g dark chocolate 
400ml double cream

Salted caramel:
150ml double cream
125g dulce de leche or Carnation caramel
1 tsp sea salt 

Heat the oven to 180c (160 fan)
Beat the butter and icing sugar until pale and creamy. Beat in the egg whites a little at a time mixing well. Fold in the flour and baking powder then add 150ml of the milk. 

Now the interesting part! You need to split the mixture into 5 portions. I did this by weight in 5 different bowls

Bowl 1: add 25ml of milk and mix to incorporate 

Bowl 2: mix 25ml of milk and 1/2 tsp cocoa together and mix in to incorporate 

Bowl 3: mix 25ml of milk, 1 tsp cocoa and 1 tsp coffee and mix in to incorporate 

Bowl 4: mix 25ml of milk, 1 1/2 tbsp cocoa and 1/2 tbsp and mix in to incorporate 

Bowl 5: mix 25ml of milk, 2 tbsp cocoa, 1tbsp coffee and the black food colouring and mix in to incorporate 

Spoon into the cake tins, smooth the tops and bake for approximately 12 minutes 

To make the ganache, break up the chocolate, heat the cream until it just reaches scalding point then add in the chocolate. Leave for a few minutes then whisk to make the ganache. It will still be quite runny but leave to cool and it will thicken. Don't leave for hours though or it will be too thick to spread!

For the salted caramel, whisk the cream until it forms soft peaks then mix in the caramel and the salt. I could only get Carnation caramel but oh my!!! This was amazing stuff. I could eat a bowl of it.

Now you need to assemble the cake. 
Place the darker coloured sponge on the bottom of your plate and spread with some caramel cream. Add the next darkest sponge and spread with ganache. Keep doing this, adding the next lightest sponge and cream/ganache. Then cover the whole cake in the remaining ganache. Decorate if you wish like I did. Leave to set. Because it's made with cream it ideally needs to be eaten within a couple of days. You only need a small slice as it's quite dense. But it was Christmas 😁😁

I decorated mine with these tiny sugar gingerbread men I found in Sainsburys and a failed Christmas present I attempted to make - my salted caramel filled chocolate gingerbread men. The mould I was using was too deep and I couldn't get half of them out without breaking them. I was so upset. But at least I had a use for them.

So I could have used that same salted caramel that I made for my chocolates, for my cake but there wasn't enough left over and I decided to stick with the recipe (ie be lazy and buy caramel). But this salted caramel that I made was delicious and I'll use this recipe again for other things 

Salted caramel:
175g caster sugar 
150ml double cream
10g unsalted butter
Large pinch of flaked sea salt 

Put the sugar into a medium saucepan over a medium heat and cook until the sugar melts and caramelises. Mane sure you don't let it go too dark, nor do you want it too light. It needs to be a rusty colour. Take off the heat and add half of the double cream and the salt. It will splutter so take care. Add the rest of the cream then the butter and stir until smooth.

Pour into a jar and leave to cool. It will eventually go to a very sticky caramel so if you want to use it to fill anything or spread you'll need to warm it up a little or use it before it goes too dense.

I'll be back later with the panna cotta and ice cream recipes 


Friday, 20 December 2013

Once upon a time

A very poor woodcutter lived in a tiny cottage in the forest with his two children, Hansel and Gretel.

Know the story? 

Everyone loves a gingerbread house don't they?! I've been planning to make a gingerbread house this Christmas for a few months and have a board on Pinterest with a few ideas. I know that Mary Berry made one on the GBBO special last week but I've not got round to watching it yet.

I believe her recipe, amongst others, uses dark muscovado sugar but I've just run out. So I used a different recipe. Eeeeek. Stress. Would the gingerbread go hard enough? Dark enough? Rise too much?

Mine did rise but not too much and it didn't affect the building of the house (phew). I'd already made some royal icing at the weekend for my Christmas cake and I make mine with powdered egg white.
1 x 8g sachet of powdered egg white, 250g icing sugar, 45ml water is my recipe for royal icing.

On to the gingerbread. I did use Mary Berry's template in a fashion (http://downloads.bbc.co.uk/tv/christmasbakeoff/gingerbread_house.pdf), I reduced the size by about 1cm top and sides and omitted the star (because I forgot). I then also forgot to cut windows but did remember the door at least. 

Ingredients: enough to make one house plus two extra gingerbread men

350g plain flour
1 tsp bicarbonate of soda 
2 tsp ground ginger
1 tsp cinnamon 
125g butter (vitalite)
175g light soft brown sugar
1 egg
4 tbsp golden syrup

Add the flour, bicarbonate and spices to a food processor and blitz to mix. Add the butter and whizz until it's like breadcrumbs then add the sugar. Mix the egg and syrup together and pulse until the mixture clumps together. Tip out and knead briefly until it forms a dough then chill for 15 minutes.

Heat the oven to 180/160 fan and line baking sheets with baking paper. Take out the dough and roll until it's about 5mm thick. Be careful when transferring to the sheets that they keep their shape. Bake until turning golden brown then leave to cool completely.

To assemble, I first stuck one front and one side together with icing also on the base to stick to the board (I used a square cake board). Use the icing like mortar. The icing shouldn't be overly runny either. 

Add the back then another side so you have the complete base. I should have taken photos at this stage but didn't. I then left it a couple of minutes to harden a bit. When I was confident to continue I added the roof panels. Here gravity really comes into play and I used cups of the correct height to hold the roof in place. Then added the second roof panel. There's a chimney too but mine was at the wrong angle to use - abandoned to the children's awaiting mouths. 

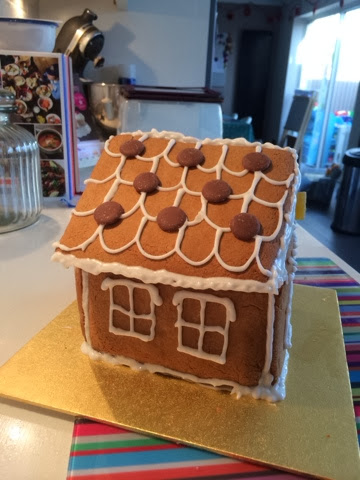
At this point I realised I had no actual plan of how to decorate and realised I'd forgot to cut windows in. So I piped windows on with extra icing on the tops and sills to look like snow. I filled in all the edges of the house and roof, piped around the door frame then decided in a millisecond to pipe on roof tiles. At this point I thought it best to raid the cupboards to see if I had any sweets. I found a small packet of chocolate buttons and some fruit pastilles so stuck those on. I then went round to add more "snow" then stood back to admire my work. So it's plain, not very inventive at all after all my Pinterest planning, but it was done and it was standing. Success!

The boys had the gingerbread men for tea and they're rather scrummy

Next year I'll try and be more inventive!