Saturday, 23 November 2013

Swirling and twirling

I like to make an edible gift for the boys' party bags so when I stumbled across green swirl biscuits on Pinterest last week, I decided I just had to make them for Hayden's birthday party. Worth a shot at least.

The original link on Pinterest was for an American recipe. Gah!!!! But a quick google search led me to a UK recipe. And relax!

Here we go:

220g butter 

220g caster sugar

1 large egg

370g plain flour

Food dye gel

Hundreds and thousands


Cream together the butter and sugar until light and fluffy then mix in the egg. Add the flour and mix until you have a smooth, well combined dough. It shouldn't be sticky at this stage.

Split the dough in half, colour one of the pieces with the food dye gel colour of your choice. I used my Kitchen Aid to do this so put this half of the dough back in the mixer, add the dye and beat until the colour is well mixed into the dough.

Place one piece of dough between two sheets of baking parchment. Roll out until dough is around 4mm thick and slightly smaller than an A3 piece of paper. Repeat with the other ball of dough, then chill the dough sheets for 30 minutes.


Take the dough out of the fridge, remove one side of the baking parchment then flip one piece of dough on top of another. 


Place the baking parchment on top and roll the dough a bit more to help the two layers to merge. Then starting with the long side tightly roll the dough into a long sausage. Wrap well in clingfilm. Roll the dough back and forth to get a tight cylinder and get rid of any bubbles in the dough. You’re aiming to roll a cylinder that has a diameter of around 4cm.

Unroll the clingfilm and place this and the dough in a shallow baking tray. Sprinkle a generous amount of sprinkles over the dough and roll it over to embed the sprinkles in the dough. It's best to use a baking tray as hundreds & thousands will roll everywhere otherwise. Randomly my Sainsburys didn't have hundreds and thousands only red, yellow and Christmas colour mix. I decided to go for red.


Wrap the dough back up and place it back in the fridge for another 30 minutes

Preheat the oven to 160°c (fan)/180°c then take the dough out of the fridge and cut into rounds about 4mm thick. Place on a lined baking tray.


Bake for 12-15 minutes until they are only just beginning to turn golden brown. Just be careful, due to the sugar content of the biscuit they can go from uncooked to burnt in a very short time

Once the biscuits have baked transfer to wire rack and leave to cool completely. They are still really quite soft at this stage but they harden on cooling. Some of the hundreds and thousands lost their colour a bit and the biscuits aren't as vibrant as the original American recipe (I say they've been photoshopped) but they do look quite nice in my opinion (better in real life than on the photos)


    Thursday, 21 November 2013

    Muffins but the savoury kind

    I've been meaning to have a go at English Muffins since I saw them as the technical challenge on GBBO and finally got around to making them. I decided to therefore use the GBBO recipe which is as follows:

    300g strong white bread flour
    6g fast-action yeast
    6g salt
    15g caster sugar 
    15g softened butter, cut into small pieces
    1 medium free-range egg
    170ml milk 
    Semolina plus extra for dusting

    Tip the flour into a large mixing bowl. The recipe states you should knead by hand but I decided to go with the dough hook as I knew it was a wet dough. 

    Sprinkle the yeast on one side of the flour and the salt into the other side of the flour. Add the sugar, butter, egg and milk, then mix all the ingredients together to form a soft dough then let the hook knead for 10 minutes, or until soft, smooth and stretchy. The dough was fair too wet for my liking so I did what you're not supposed to do and added a bit more flour.

    Lightly grease a large bowl with oil. Place the dough in the oiled bowl, cover and leave to prove for about one hour, or until doubled in size. By this point mine had hardly risen. No idea what I'd done so maybe actually do do them by hand!

    Dust the work surface with a mixture of the semolina and flour. Tip the dough out onto the work surface and roll out to about 2.5cm thick.

    Lightly dust two baking trays with half of the semolina

    Using a 9cm straight-sided cutter, cut out eight muffins. I didn't measure my cutter, just used what I thought looked right. 

    Place four muffins, evenly spaced apart on each of the dusted baking trays. Dust the remaining semolina or polenta over the top of the muffins and leave to prove for another 30 minutes. They did change a little bit by this point.


    Now......the recipe then goes like this:
    Preheat a hot plate or a heavy-based frying pan on the hob to a very low heat. Griddle the muffins for approximately 5-6 minutes, then flip over and griddle for another 5-6 minutes on the other side.


    I have a hot plate but could only fit two on so did two in a frying pan too. I only had 4 muffins out of my dough because it just didn't rise. You're supposed to get 8. After 6 minutes each side they still felt doughy in the middle so I popped them into the oven to bake a bit. 


    Ideally you're supposed to leave them to cool then slice and toast but we ate ours straight away with butter, bacon and poached eggs. They were nice and turned out ok. I would hope to get the requisite number out of the dough next time, maybe make them a tad smaller and roll the dough a bit thinner as I think they were too thick. So not a total fail. Just a small one maybe.

    I certainly wouldn't have done well in that technical bake off!


    Mine's on the left. Shop bought on the right 


    Wednesday, 6 November 2013

    Whoopie!!

    Having only ever eaten one whoopie pie in my life and being really behind the times, when thinking what to bake for Bonfire, for some random reason I decided to try a whoopie pie for the first time. They're so last year (or two or three) darling but hey ho!

    But what is a whoopie pie some may be asking? Well it's half cake, half cookie, so not hard but not soft like a bun. The name whoopie pie comes from years back when Amish farmers would find the treats in their lunch and would shout "Whoopie".

    November to me is Parkin month. I wanted to try and find a recipe that combined Parkin with the whoopie pie but they don't exist online and I left it too late to come up with my own recipe. One flavour of Parkin though is ginger so I thought Gingerbread whoopie pies might be nice. I settled on an American recipe as a lot of recipes contain buttermilk and I'd already been shopping so ideally wanted a store cupboard recipe. And this one was. I noticed though it was in the dreaded cups which I thought might be ok but the flour was measured in ounces. Eek. Stress! But the website had an easy conversion button on it and voila. One press and all my dreams came true.

    Here we go:
    280g plain flour
    100g caster sugar
    120g dark muscovado sugar
    2 1/2 tsp ginger
    1 1/4 tsp baking powder (recipe said baking soda-no idea if that's baking powder or bicarbonate of soda so I plumped for baking powder)
    1 tsp cinnamon
    3/4 tsp salt 
    80ml vegetable oil
    1 egg
    80ml boiling water 

    Preheat the oven to 180c fan

    Line baking sheets with grease proof paper.

    Combine the flour, white sugar, muscovado, ginger, baking powder, cinnamon, and salt together in a large bowl. Mix in the vegetable oil and egg until combined. Pour in the boiling water and whisk until smooth. It makes a very thick sticky batter.


    Drop in spoonfuls (huh?) onto the baking sheets. I had no idea how big they were supposed to be so just guessed.


    See how thick and gloopy they look? I was getting a bit nervous by this point.

    Bake in the oven for 12-14 minutes and allow to cool on the sheets for 5 minutes before removing to a cooling rack.

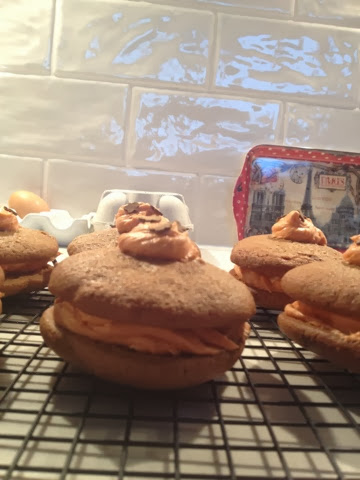
    For the filling I decided to just make a spiced buttercream. I have no idea of quantities as I generally make my buttercream from taste, mixing icing sugar with butter. I added a tsp of ginger and a tsp of cinnamon then some orange food colouring as I wanted it to be orange for some random reason.

    So here we are. My mahoosive gingerbread whoopie pies.


    But I wasn't done. I had a bit of filling leftover and just got some gorgeous mini teeny weeny sparkly gingerbread men from Sainsbos so decided to put a swirl of filling on top and top with three gingerbread men. How very festive of me!

    No idea if everyone else liked them but I liked mine and looking forward to making a chocolate version. I'm thinking chocolate and cherry or chocolate and orange. Any takers!


    Wednesday, 30 October 2013

    Devilishly good?

    It's Halloween tomorrow and a few days ago I saw a fab photo of some yummy looking cupcakes. These were last year's (orange sponge, black frosting) so decided to do something similar this year. 


    The recipe which went with the photo I saw of the cupcakes I wanted to make, was a devil's food cake recipe. But it used cups. I don't like using cups so settled on god old faithful Ms Lawson's Devil's food cake recipe. The recipe is for a cake (8"/20cm) but I figured it'd fit into 12 muffin cases. And it did! I use muffin cases rather than cupcake cases

    Devil's food cupcake batter:
  1. 50g cocoa powder
  2. 100g dark brown muscovado sugar
  3. 250 ml boiling water
  4. 125g soft unsalted butter
  5. 150g caster sugar
  6. 225g plain flour
  7. ½ teaspoon baking powder
  8. ½ teaspoon bicarbonate of soda
  9. 2 large eggs

  10. Preheat the oven to 170c fan.

    Put the cocoa and dark muscovado sugar into a bowl and pour in the boiling water. Whisk to mix, then set aside. 
    Cream the butter and caster sugar together, beating well until pale and fluffy.

    Measure the flour, baking powder and bicarb together in another bowl, and set aside for a moment. Add 1 egg to the creamed butter and sugar, followed by a scoopful of flour mixture, then the second egg. Keep mixing and incorporate the rest of the dried ingredients for the cake, then finally mix and fold in the cocoa mixture, scraping it's bowl well with a spatula.

    It's a runny batter so I used a ladle to fill the muffin cases until 3/4 full. 


    Bake for 18 minutes until they're nicely risen and a cake tester comes out clean. Leave to cool.


    (Excuse the yellow patches in mine, I didn't mix the batter well enough)

    I've been struggling with buttercream frosting being too sweet recently (for my very opinionated family cake testers) so decided I'd have a go at a cream cheese frosting for these bad boys and hope that it would take colouring without turning funny. I have a red sugarflair gel but I wanted to use extra red as most times I use the normal red it'll turn what I'm colouring pink.

    Frosting:
    4 tbsp butter (softened)
    200g cream cheese
    400g icing sugar

    Mix the icing sugar and butter for 2-3 minutes until combined and creamy. Add the icing sugar in 2 or 3 goes (attempting to avoid an icing cloud of doom which covers the kitchen in fairy dust). Pop into the fridge until you're ready to use.

    It's preferable to make the devil's horns the day before to give them time to go hard. Colour fondant black (I used extra black) and break off little balls, roll in your hand to a taper on one end and turn upwards to make a horn shape.

    Frost the cupcakes when cold and add your horns!


    I think someone enjoyed them!


    Saturday, 26 October 2013

    Peaches and cream

    I decided to try a recipe that wouldn't be one I'd go for seeing as I won't be eating what I was going to bake so decided I'd try Hummingbird Bakery's coconut and pineapple cupcakes.

    After a small family discussion (read argument), it was decided for me that I wouldn't be doing coconut and pineapple cupcakes rather that I should do the peaches and cream. Everything was store cupboard anyway for both so off I went to start.


    120g plain flour

    140g caster sugar

    1 1/2 teaspoons baking powder

    40g unsalted butter

    120ml full fat milk

    1 egg

    1/4 teaspoon vanilla extract

    400g tinned sliced peaches 

    Beat the flour, sugar, baking power and butter until the mixture has a sandy consistency. Gradually pour in half the milk and beat until it is just incorporated.

    Whisk the egg, vanilla and remaining milk together then pour it into the flour mixture. Beat until the mixture is smooth. Don't overbeat. It's a very loose mixture, one that I'm not normally used to when making cakes.

    Add the sliced peaches to the cupcake cases. I found that one tin had enough peach segments to put two per case and fill 11 cases like this:


    Fill the cases until two thirds full

    Bake at 170c fan for 20 or 25 minutes, until the tops are golden. Leave in the tin to cool. When you take them out they'll have a very squishy bottom oo er

    Frosting: 

    250g icing sugar

    80g unsalted butter

    25ml milk

    a few drops of vanilla extract

    Beat the icing sugar and butter together until the mixture comes together. Add the vanilla extract and milk. Turn your mixer up to high speed and beat for about 5 minutes or until the frosting is light and fluffy. I found though it was too loose so added more icing sugar. 

    Ice the cupcakes and top with some Demerara sugar.

    Warning: These need to be eaten with a spoon!

    Comments were that the cake was lovely but the icing too sweet. Next time I'll substitute the topping for whipped cream or just pour over some cream as you need to eat with a spoon anyway.


    Monday, 21 October 2013

    Piece of pie

    Pies and pies. I decided to make a chicken pie and then as dessert I'd decided that I wanted to make a recipe I saw a couple of weeks ago. Ok, so it meant pie followed by pie but actually, if you ask yourself, what is wrong with having pie then pie? After all, one is savoury, the other sweet and in my defence they both had different pastries.

    So the savoury pie was chicken, tarragon and mushroom with (shocker) shop bought puff pastry. I've still to make puff pastry, even rough puff. But this wasn't the time (aka cba).

    I made a chicken and tarragon pie twice last year but can't remember which recipe I used so I decided to make Jamie's 30 minute chicken pie and add tarragon.

    I used to detest tarragon until about two years ago. It's an odd flavour and probably one a lot of people don't like, but this pie can easily be made with another herb or non at all. So here goes with my slightly adapted recipe:

    One pack puff pastry
    Four chicken breasts
    One onion, chopped
    One pack chestnut mushrooms, chopped 
    1 tbsp flour
    2 tbsp creme fraiche
    2 tsp English mustard
    250 ml chicken stock
    Half pack of fresh tarragon
    Egg for glazing

    Preheat the oven to 200/180 fan

    Chop the chicken into chunks and fry with the onions for a few minutes until sealed. Add the mushrooms and cook for a couple of minutes. Add the flour then the creme fraiche, mustard and chicken stock. Finally add the tarragon.

    Roll out the pastry to cover the dish you're using. I used a rectangular dish approx 30 x 15. Pour in the pie mix, top with the pastry crimping the edges and brush with egg wash. Cook for 15-20 minutes until golden brown.

    I did get some leakage into my oven from the pie so best to put the dish on a tray.

    Unfortunately I don't have any photos. But it did look yummy, take my word!

    So the second pie was a flaky pastry toffee apple pie (links are at the bottom) 

    The pastry recipe is in the link and made a lovely buttery flaky pastry, a pastry I've never made before. For the pie, a really easy pie, you just need to make a toffee, add some sliced apples, cover and bake.

    150g butter
    75g light muscovado sugar 
    475g apples (I used bramley)
    1 egg to glaze

    I didn't have any light muscovado sugar in so used half Demerara and half dark brown soft sugar. 

    Melt the butter and sugar together gently until it makes a thick toffee then leave to cool while you slice the apples.

    Decore, peel and slice the apples.

    Roll out half of your pastry and line the tin/dish. I used a ceramic pie dish which I thinks about 25cm diameter. Scatter in the apples, they don't need to be in a pattern. Pour over the toffee. Roll out the second half of your pastry and cover the top, crimping the edges and glaze with egg wash. Bake for 35 minutes until golden brown. Serve with custard (yuck) or cream (heaven)


    http://www.thepinkwhisk.co.uk/2013/10/flaky-pastry-toffee-apple-pie.html
     http://www.thepinkwhisk.co.uk/2013/10/flaky-pastry.html

    Thursday, 17 October 2013

    A cake for an occasion

    Long story short, I was asked to make a small lactose free post-wedding cake so the blushing bride could enjoy some cake as didn't get to at her own wedding.

    Now I love baking more than anything (except my family) but decorating is not my forté. I did do a cake decorating course but I struggled to get my head round spending hours making something for it to be destroyed in seconds so never sat the final examinations. At least with sewing, I'm general what I make can last a lifetime potentially.

    All credit to people who decorate cakes as a job. It's hard work getting that fondant to place right. But I'm always up for a challenge and having made 40 roses for some anniversary cupcakes in July, I decided more roses (as were also on the original wedding cake) were the way to go. 

    Slight disaster when my royal icing was too runny and I'd run out of icing sugar so the initial edge piping turned out too runny but I managed to get it sorted to pipe the little dots into the cake. Add the roses et voila: 

    Lemon and blackcurrant midi two tiered celebration cake 

    Hope the happy couple enjoy it!

    My next attempt at a decorated cake will be coming up end of November and I'm petrified already.